With the launch of iOS 10 developers can make use of a new exciting API: Speech Recognition. The concept of translating audio to text is known to both the users and the developers. iOS has offered this feature through Siri, and its keyboard dictation button in the previous versions. Yet, the new framework has more benefits and is easy to implement, as you are soon to discover.
The code for this article can be downloaded on GitHub.
What’s new?
Dictation was hard to work with, because of its limitations. It was possible to access it only through the default keyboard, or elements that support TextKit. If the keyboard language wasn’t supported, too bad for you! Recognition could only be performed on live audio, and all you had in return was plain text. That could be more than enough for certain apps, but you may want to do a little more.
The API offers more functionalities to the developers. It allows them to use the framework anywhere in their app, without the need of the keyboard presence. Audio can be given as input from a pre-recorded file, or a live source. In both cases, you have control on when to start and stop the operation, which was not possible before. Additionally, the language can be set regardless of the system language. You can choose between over 50 available languages.
UI setup
Let’s have a taste of the API and build a simple application. For the UI I have only used a couple of views: a UIImageView for the microphone icon, and a UILabel for outputs. The entire view is touchable through a UIButton.
All three views are declared as outlets in ViewController.swift.
@IBOutlet weak var noteLabel: UILabel!
@IBOutlet weak var microphoneImageView: UIImageView!
@IBOutlet weak var button: UIButton!
The Touched in action for button is added as follows.
@IBAction func tappedButton() {

}
To connect the IBOutlets and the IBAction, just click on the circle on the left and drag to the corresponding view. This is demonstrated below.

The other way around can also be used to link outlets. Hold Ctrl and drag the view to the line of code where you want to add the parameter.
Requesting permissions
The heavy work of the recognition process is done on Apple servers, except for some newer devices, which support speech recognition all the time. Since the audio data leaves the device, the user must show his consent before the service can be used.
Let’s add a new function in “ViewController.swift” that uses SFSpeechRecognizer. This requires importing the Speech framework.
import Speech
The funcion will ask the user’s authorization to use Speech Recognizer and return a tuple. The tuple contains a boolean which is true when permission is granted and a string with a comment on the result.
private func askMicPermission(completion: @escaping (Bool, String) -> ()) {
    SFSpeechRecognizer.requestAuthorization { status in

    }
}
The function requestAuthorization returns an enumeration of type SFSpeechRecognizerAuthorizationStatus. Switch through the possible values and set a message for each of them. Add the following code inside the body of requestAuthorization.
let message: String
var granted = false

switch status {
    case .authorized:
        message = "Listening..."
        granted = true
        break
    case .denied:
        message = "Access to speech recognition is denied by the user."
        break
    case .restricted:
        message = "Speech recognition is restricted."
        break
    case .notDetermined:
        message = "Speech recognition has not been authorized, yet."
        break
}
Finally, let’s call completion with the required tuple.
completion(granted, message)
The function we wrote will be called when trying to start or stop listening for audio data. The listener is already in place.
@IBAction func tappedButton() {
    askMicPermission(completion: { (granted, message) in

    })
}
If you run the project at this state, it will fail when the view is tapped. iOS 10 requires adding a description string to the .plist file for each access request. These strings should help the user understand why you need permission, or how you intend to use it.
Open “Info.plist” and inside the main dictionary tags add the following key.
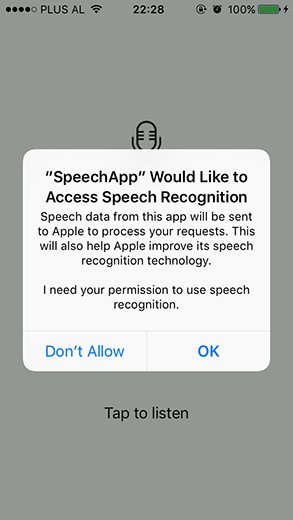
<key>NSSpeechRecognitionUsageDescription</key>
<string>I need your permission to use speech recognition.</string>
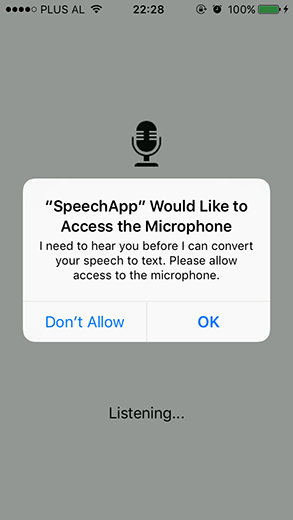
Do the same to request access to the microphone, which we will need later.
    <key>NSMicrophoneUsageDescription</key>
    <string>I need to hear you before I can convert your speech to text. Please allow access to the microphone.</string>
</dict>
The following screenshots show what it looks like. Notice how Apple informs the user that speech data will be sent to its servers.
Implementing the API
ViewController class should conform to the SFSpeechRecognizerDelegate protocol to track the availability of the speech recognizer.
class ViewController: UIViewController, SFSpeechRecognizerDelegate {
These are the variables we are going to need. Declare them globally in ViewController class.
private var listening = false
private var speechRecognizer: SFSpeechRecognizer?
private var recognitionRequest: SFSpeechAudioBufferRecognitionRequest?
private var recognitionTask: SFSpeechRecognitionTask?

private let audioEngine = AVAudioEngine()
Initializing speechRecognizer requires a locale identifier, which I have set to Albanian…
speechRecognizer = SFSpeechRecognizer(locale: Locale.init(identifier: "sq-AL"))
speechRecognizer?.delegate = self
… but that, of course, did not work.
Cannot make recognizer for sq-AL. Supported locale identifiers are ..
This was to emphasize the importance of paying attention to the locale and make sure the API supports it. Change the identifier to “en-US”.
Now let’s write a function to perform the actual work. We will fill the body of this function step by step.
private func startListening() {

}
Check if there is a recognition task running and cancel it to start a new one.
if recognitionTask != nil {
    recognitionTask?.cancel()
    recognitionTask = nil
}
Try to activate the audio session.
let audioSession = AVAudioSession.sharedInstance()
do {
    try audioSession.setCategory(AVAudioSessionCategoryRecord)
    try audioSession.setMode(AVAudioSessionModeMeasurement)
    try audioSession.setActive(true, with: .notifyOthersOnDeactivation)
} catch let error {
    noteLabel.text = "An error occurred when starting audio session. \(error.localizedDescription)"
    return
}
Create a Recognition request that will take as input an audio buffer. Then check the audio engine input node. If there is no input node, it means the device does not have a microphone from where to get the audio.
recognitionRequest = SFSpeechAudioBufferRecognitionRequest()

guard let inputNode = audioEngine.inputNode else {
    fatalError("No input node detected")
}

guard let recognitionRequest = recognitionRequest else {
    fatalError("Unable to create an SFSpeechAudioBufferRecognitionRequest object")
}
Next, start the recognition task. From the result, we can get a list of possible transcriptions. Otherwise, stick with the bestTranscription and add it to the noteLabel. The completion handler may be called many times. We check if the user has finished recording from the result.isFinal value. If this is the case, or an error has occurred with the recognition process, the audio engine is stopped. The task is then set to nil to release resources.
recognitionTask = speechRecognizer?.recognitionTask(with: recognitionRequest, resultHandler: { (result, error) in

    var isFinal = false

    if result != nil {
        self.noteLabel.text = result?.bestTranscription.formattedString
        isFinal = result!.isFinal
    }

    if error != nil || isFinal {
        self.audioEngine.stop()
        inputNode.removeTap(onBus: 0)

        self.recognitionRequest = nil
        self.recognitionTask = nil

        self.noteLabel.text = "Tap to listen"
    }
})
When getting audio from the microphone, it is added to a buffer in memory. This is passed to the recognitionRequest.
let recordingFormat = inputNode.outputFormat(forBus: 0)
inputNode.installTap(onBus: 0, bufferSize: 1024, format: recordingFormat) { (buffer, when) in
    self.recognitionRequest?.append(buffer)
}
Finally, prepare and start the AVAudioEngine.
audioEngine.prepare()

do {
    try audioEngine.start()
} catch let error {
    noteLabel.text = "An error occurred starting audio engine. \(error.localizedDescription)"
}
The following function is a “panic button” to stop everything from running. It is helpful when the user taps the view again, the app goes in the background or similar scenarios.
private func stopListening() {
    self.audioEngine.stop()
    self.recognitionRequest?.endAudio()
}
Let’s update the tappedButton function to perform the right action. The code is executed in the main thread. According to the value of listening the microphone image and the text of the label are changed. Then if the user has granted permission the app starts or stops listening for audio input.
DispatchQueue.main.async {
    if self.listening {
        self.listening = false
        self.microphoneImageView.image = UIImage(named: "Microphone")

        if granted {
            self.stopListening()
        }
    } else {
        self.listening = true
        self.microphoneImageView.image = UIImage(named: "Microphone Filled")
        self.noteLabel.text = message

        if granted {
            self.startListening()
        }
    }
}
There are different reasons for the recognizer to become unavailable. Losing internet connection, or changing permissions in Settings are two of them. Add a listener to handle this cases. When the recognizer becomes unavailable the button disables and a message shows. When it becomes available again, the button and the label text are reset to the default state.
func speechRecognizer(_ speechRecognizer: SFSpeechRecognizer, availabilityDidChange available: Bool) {
    button.isEnabled = available
    if available {
        listening = true
        noteLabel.text = "Tap to listen"
        tappedButton()
    } else {
        noteLabel.text = "Recognition is not available."
    }
}
Time for a speech
We are finally ready to see our app in action. The simulator doesn’t help in this case, we need a real device running iOS 10. After running the project, tap the phone screen, and the “Listening…” message will appear. A little creativity in choosing what to say is fun. I stuck with a simple greeting.


I don’t use speech-to-text or voice commands on daily basis. Adding the fact that I am a non-native English speaker, the app found a little hard at first to give correct output. Yet, it gets better the more you use it, and the accuracy is acceptable.
Restrictions
Besides the advantages of the Speech API, there are also some restrictions to it. These restrictions relate to the duration of the audio, and availability of the API. For iOS 10 the audio duration limit is one minute.
In availability, devices are limited to how many recognitions they can perform daily. This is also valid for recognitions per app. Apple has advised contacting for support if this limit is reached often.
Another thing to note is the high impact on battery drain and the network traffic. So is better to keep an eye out for long sessions, and mobile data usage.
Best practices
To ensure the best user experience there are some things to take in consideration.
- The first I would mention is to make sure that the user knows what is going on. Interact with the user, let him know the recognition is taking place, or that he is being recorded.
- To use speech recognition to enter a password, credit card number or other sensitive data is a poor choice.
- Prepare for any scenario. The process may fail for many reasons. Starting from hitting a limit, to losing Internet connection, to the user aborting the operation. Handle these cases with a proper message.
Conclusion
Speech framework is a great addition to iOS 10, using the same technology as Siri and Dictation. It provides results without having to collect user data and it is easy to implement. It offers more context on the results: timing information, confidence levels, and alternative interpretations.
Have fun using this API in your applications!
May the Code be with you!