It doesn’t matter if the main focus of your app is to capture an amazing landscape, or just an innocent selfie. What is important to developers is to let users make the most out of the camera and do it painlessly. To that end, Apple has done a remarkable work presenting AVCapturePhotoOutput in iOS 10. In this article I will show how to implement some of its features. The full project can be downloaded from GitHub.
What’s new?
Surely, iOS apps were able to use the camera before. However, the framework has new features and improved the existing ones.
- Live Photos mixes a picture with a short video. This makes photos ‘come alive’ and better recall a memory.
- RAW photo capturing is now possible.
- Thumbnail images are available when capturing a photo. This is helpful to preview an image to the user.
- Also, you can take Wide Color pictures.
Let’s get to it.
A short setup
To keep focus, I have not included the steps to design the UIViewController. It can be copied from the storyboard on the full project, or you can customize the design to your preferences.
Start by importing the right frameworks:
import UIKit
import AVFoundation
import Photos
Then, declare the following variables and outlets:
var captureSession = AVCaptureSession()
var cameraOutput = AVCapturePhotoOutput()
var previewLayer = AVCaptureVideoPreviewLayer()
var currentImage: (image: Data, imageName: String)?

var previewing = false
var highResolutionEnabled = true
var rawEnabled = false
var live = .Off
var flashMode = AVCaptureFlashMode.off
var cameraPosition = AVCaptureDevicePosition.back

@IBOutlet weak var capturedButton: UIButton!
@IBOutlet weak var previewView: UIView!
@IBOutlet weak var menuView: UIView!
@IBOutlet weak var toastLabel: UILabel!
@IBOutlet weak var saveButton: UIButton!
LiveMode is a custom enum.
enum LiveMode {
    case On, Off, Unavailable
}
To display a message on the screen a label is shown using the following function.
func showToast(text: String) {
    toastLabel.text = text
    UIView.animate(withDuration: 1.0, animations: {
        self.toastLabel.alpha = 1.0
    })
    UIView.animate(withDuration: 1.0, delay: 2.0, options:
    .curveLinear, animations: {
        self.toastLabel.alpha = 0.0
    }, completion: nil)
}
Now we are ready to move on.
Permissions
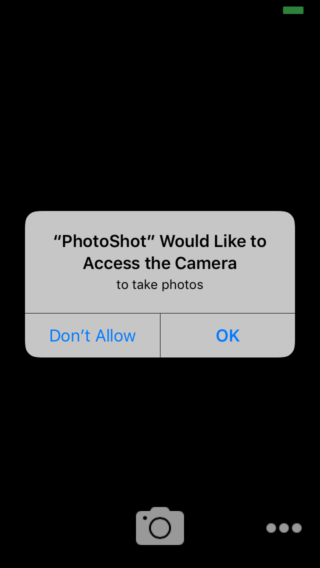
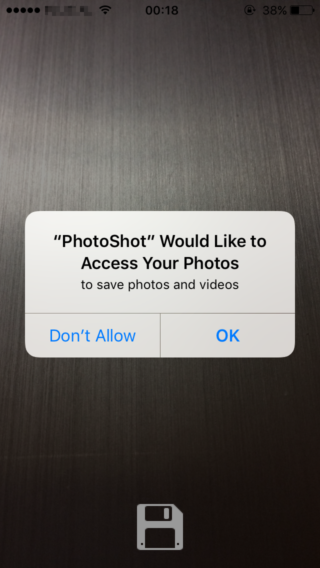
When requesting access to sensitive data in iOS 10, a description string should be added to the info.plist file, which will be displayed to the user to let them know what you’ll do with the data. The following keys describe usage of the photo library, and camera, respectively. This should help the user to understand better why are trying to access these components.
<key>NSPhotoLibraryUsageDescription</key>
<string>to save photos and videos</string>
<key>NSCameraUsageDescription</key>
<string>to take photos</string>
The first time a message will show as in the following screenshots. Then the user choice will be remembered.
Loading the camera
Before the user can interact with the app, the camera should load. This is done in the viewDidLoad method
override func viewDidLoad() {
    super.viewDidLoad()
    loadCamera()
}
We should make sure that the camera is available in the first place. The AVCaptureDevice is initialized using a camera position set by the user. This starts the front or the rear camera.
func loadCamera() {
        let device = AVCaptureDevice.defaultDevice(withDeviceType: .builtInWideAngleCamera, mediaType: AVMediaTypeVideo, position: cameraPosition)
Before using the captureSession, any previous input is removed. This is needed when camera is switched from front to rear and vice versa.
captureSession.removeInput(captureSession.inputs.first as! AVCaptureInput!)
Add the cameraOutput to the AVCaptureSession. This is when we check if the Live Photo capture is available, and set High Resolution capture to the user choice.
if let input = try? AVCaptureDeviceInput(device: device) {
    if (captureSession.canAddInput(input)) {
        captureSession.addInput(input)
        if (captureSession.canAddOutput(cameraOutput)) {

            cameraOutput.isHighResolutionCaptureEnabled = self.highResolutionEnabled
            captureSession.addOutput(cameraOutput)

            if !cameraOutput.isLivePhotoCaptureSupported {
                self.live = .Unavailable
            }
            // Next, the previewLayer is setup to show the camera content with the size of the view.

            previewLayer = AVCaptureVideoPreviewLayer(session: captureSession)
            previewLayer.frame = previewView.bounds
            previewLayer.videoGravity = AVLayerVideoGravityResizeAspectFill
            previewView.clipsToBounds = true
            previewView.layer.addSublayer(previewLayer)
            captureSession.startRunning()
        }
    } else {
        print("Cannot add output")
    }
}
A good practice would be to stop the captureSession when the view is no longer visible:
override func viewDidDisappear(_ animated: Bool) {
    if captureSession.isRunning {
        captureSession.stopRunning()
    } else {
        captureSession.startRunning()
    }
}
Now we have the camera working. Time to take a picture.
The first capture
To take a picture simply add the following IBAction. This action is triggered when the button with the camera icon is pressed. It is followed by the classic camera shutter sound effect.
@IBAction func didPressTakePhoto(_ sender: UIButton) {
    var settings = AVCapturePhotoSettings()

    cameraOutput.capturePhoto(with: settings, delegate: self)
}
There are two things to notice in the parameters of the request. The settings are an object we have just created (properties will be added in another step). The delegate is the AVCapturePhotoCaptureDelegate protocol which the class should conform to. This is done in an extension of the class.
extension ViewController : AVCapturePhotoCaptureDelegate {

    func capture(_ captureOutput: AVCapturePhotoOutput,
        didFinishProcessingPhotoSampleBuffer photoSampleBuffer: CMSampleBuffer?,
        previewPhotoSampleBuffer: CMSampleBuffer?,
        resolvedSettings: AVCaptureResolvedPhotoSettings,
        bracketSettings: AVCaptureBracketedStillImageSettings?,
        error: Error?)
    {
        if let error = error {
            print("Capture failed: \(error.localizedDescription)")
        }
    }
}
This method is called when all the processes are finished and the photo is ready.
Thumbnail
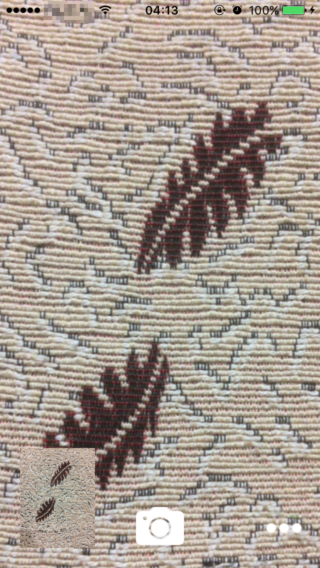
When capturing a photo the natural next thing to do is to display a preview of it. AVFoundation makes this easy. It offers the possibility to specify the image dimensions and get a preview when the processing is done.
We just need to modify the capture function above to show the image in the bottom left corner as shown in the photo.
if let error = error {
    print("Capture failed: \(error.localizedDescription)")
}

if  let sampleBuffer = photoSampleBuffer,
    let previewBuffer = previewPhotoSampleBuffer,
    let dataImage =  AVCapturePhotoOutput
        .jpegPhotoDataRepresentation(forJPEGSampleBuffer: sampleBuffer, previewPhotoSampleBuffer: previewBuffer) {

    self.currentImage = (dataImage, "\(resolvedSettings.uniqueID).jpg")
    showImage()
}
Here the buffer is converted to a Data object and set as the current image. The function showImage just takes this object and sets it as the capturedButton image.
func showImage() {
    let dataProvider = CGDataProvider(data: self.currentImage!.image as CFData)
    let cgImageRef: CGImage! = CGImage(jpegDataProviderSource: dataProvider!, decode: nil, shouldInterpolate: true, intent: .defaultIntent)
    let image = UIImage(cgImage: cgImageRef, scale: 1.0, orientation: UIImageOrientation.right)

    self.capturedButton.imageView?.contentMode = .scaleAspectFill
    self.capturedButton.setImage(image, for: .normal)
    self.capturedButton.isHidden = false
}
To set the dimensions of the preview, we need to add a preview format to the AVCapturePhotoSettings object.
var settings = AVCapturePhotoSettings()
let previewPixelType = settings.availablePreviewPhotoPixelFormatTypes.first!
let previewFormat = [
    kCVPixelBufferPixelFormatTypeKey as String: previewPixelType,
    kCVPixelBufferWidthKey as String: self.capturedButton.frame.width,
    kCVPixelBufferHeightKey as String: self.capturedButton.frame.height
] as [String : Any]
settings.previewPhotoFormat = previewFormat
Saving data
The option to save the captured photo in the library is made available in this project when previewing the thumbnail. A simple animation is put in place for the transition from the thumbnail to full screen and vice versa. This also shows and hides the Save button.
@IBAction func previewClicked() {
    UIView.animate(withDuration: 0.5, animations: {
        if !self.previewing {
            self.capturedButton.frame = self.view.frame
            self.saveButton.isHidden = false
        } else {
            let x: CGFloat = 20.0
            let y: CGFloat = self.view.frame.height - 100.0 - 20.0
            self.capturedButton.frame = CGRect(x: x, y: y, width: 75.0, height: 100.0)
            self.saveButton.isHidden = true
        }
    })
    previewing = !previewing
}
When the Save button is tapped, the user is asked for permission to access the photo library. We proceed trying to save the photo only when this permission is granted. The showToast function is called in the main thread since it modifies the UI.
@IBAction func saveClicked() {
    if let image = currentImage {
        PHPhotoLibrary.requestAuthorization({ (status) in
            if status == .authorized {
                do {
                    try self.save(image: image.image, withName: image.imageName)
                } catch let error {
                    print(error.localizedDescription)
                }
            } else {
                DispatchQueue.main.async {
                    self.showToast(text: "Not authorized!")
                }
            }
        })
    }
}
Finally, the real work is done in the save function. First the image is saved into a temporary file.
func save(image: Data, withName: String) throws {
    let url = URL(fileURLWithPath: NSTemporaryDirectory().appending(withName))

    try image.write(to: url, options: .atomicWrite)
Then, the PHPhotoLibrary is used to add the image as a resource. The performChanges function also has a completionHandler to make UI changes or other work.
PHPhotoLibrary.shared().performChanges({
    let request = PHAssetCreationRequest.forAsset()
    request.addResource(with: .photo, data: image, options: nil)

    let creationOptions = PHAssetResourceCreationOptions()
    creationOptions.shouldMoveFile = true
    request.addResource(with: .alternatePhoto, fileURL: url, options: nil)

}, completionHandler: { (success, error) in

    if let error = error {
        print(error.localizedDescription)
        return
    }
After making sure everything is fine, the temporary file is removed and a success message is displayed.
        if FileManager.default.fileExists(atPath: url.absoluteString) {
            do {
                try FileManager.default.removeItem(at: url)
            }
            catch let err {
                print(err.localizedDescription)
            }
        }

        DispatchQueue.main.async {
            self.saveButton.isHidden = true
            self.showToast(text: "Image saved")
        }
    })
}

RAW
RAW image capturing, as well as Live Photos, is available on iPhone 6s, 6s+, SE and the 9.7″ iPad Pro. RAW photos are uncompressed and have more bits per pixel, allowing more editing options.
To capture a RAW photo AVCaptureSessionPresetPhoto format is required and the rear camera. The code is very similar to what the normal image capture. The AVCapturePhotoSettings in this cased are initialized using a raw pixel format.
    if rawEnabled {
        if let rawFormat = cameraOutput.availableRawPhotoPixelFormatTypes.first {
            settings = AVCapturePhotoSettings(rawPixelFormatType: OSType(rawFormat))
        }
    }
Now the following callback is added to the extension of the class. The format of the file in this case is .dng.
func capture(_ captureOutput: AVCapturePhotoOutput,
            didFinishProcessingRawPhotoSampleBuffer rawSampleBuffer: CMSampleBuffer?,
            previewPhotoSampleBuffer: CMSampleBuffer?,
            resolvedSettings: AVCaptureResolvedPhotoSettings,
            bracketSettings: AVCaptureBracketedStillImageSettings?,
            error: Error?) {

    if let error = error {
        print("Capture failed: \(error.localizedDescription)")
    }

    if  let sampleBuffer = rawSampleBuffer,
        let previewBuffer = previewPhotoSampleBuffer,
        let dataImage =  AVCapturePhotoOutput
            .dngPhotoDataRepresentation(forRawSampleBuffer: sampleBuffer, previewPhotoSampleBuffer: previewBuffer) {
        self.currentImage = (dataImage, "\(resolvedSettings.uniqueID).dng")
        showImage()
    }
}
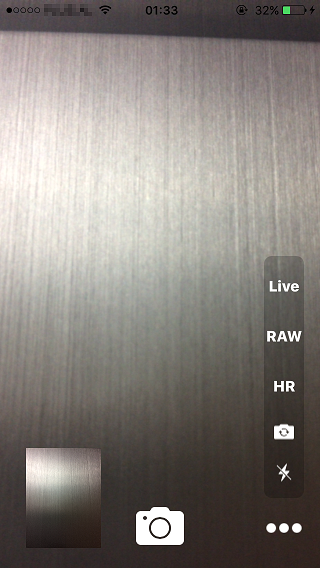
More options
To change a few settings like flash or the camera position, I have added a menu on the bottom right. It is made visible through this function.
@IBAction func moreClicked() {
    UIView.animate(withDuration: 1.0, animations: {
        self.menuView.alpha = 1.0 - self.menuView.alpha
    })
}
Each of the buttons has its IBAction that is triggered.
High resolution
Changes the boolean value and the font of the button text.
@IBAction func toggleHR(button: UIButton) {
    highResolutionEnabled = !highResolutionEnabled
    button.titleLabel?.font = highResolutionEnabled ?
        UIFont (name: "System-Heavy", size: 15) :
        UIFont (name: "System-Thin", size: 15)

    showToast(text: "High resolution: \(highResolutionEnabled)")
}
Then the following parameter is set to the AVCapturePhotoSettings.
settings.isHighResolutionPhotoEnabled = self.highResolutionEnabled
Camera position
Changes the position and reloads the camera.
@IBAction func toggleCamera() {
    if cameraPosition == .back {
        cameraPosition = .front
        showToast(text: "Camera: front")
    } else {
        cameraPosition = .back
        showToast(text: "Camera: back")
    }

    loadCamera()
}
Flash
Since flash mode has three possible values a switch case is used to loop through the choices. The image on the button is set accordingly.
@IBAction func toggleFlash(button: UIButton) {
    switch self.flashMode {
    case .off:
        self.flashMode = .on
        showToast(text: "Flash mode: on")
        button.setImage(UIImage(named: "FlashOn"), for: .normal)
        break
    case .on:
        self.flashMode = .auto
        showToast(text: "Flash mode: auto")
        button.setImage(UIImage(named: "FlashAuto"), for: .normal)
        break
    case .auto:
        self.flashMode = .off
        showToast(text: "Flash mode: off")
        button.setImage(UIImage(named: "FlashOff"), for: .normal)
        break
    }
}
Before capturing the image the settings are updated with the flash mode if it is available.
if cameraOutput.supportedFlashModes.contains(NSNumber(value: self.flashMode.rawValue)) {
    settings.flashMode = self.flashMode
}
RAW
Earlier we saw how to capture a RAW image, but to toggle between RAW and normal photo we need the following function. First we check if this it is available to capture a RAW image and then proceed similar to the high resolution toggle function.
@IBAction func toggleRAW(button: UIButton) {
    if cameraOutput.availableRawPhotoPixelFormatTypes.count == 0 {
        showToast(text: "RAW not available")
        return
    }

    rawEnabled = !rawEnabled
    button.titleLabel?.font = rawEnabled ?
    UIFont (name: "System-Heavy", size: 15) :
    UIFont (name: "System-Thin", size: 15)

    showToast(text: "RAW: \(rawEnabled)")
}
Live
The value for the live variable is set when loading the camera. It is -1 when it is not available, and 0 or 1 when it is on or off.
@IBAction func toggleLive(button: UIButton) {
    switch live {
    case .Unavailable:
        showToast(text: "Live photo not supported")
        break

    case .On:
        live = .Off
        showToast(text: "Live: off")
        button.titleLabel?.font = UIFont (name: "System-Thin", size: 15)
        break

    case .Off:
        live = .On
        showToast(text: "Live on")
        button.titleLabel?.font = UIFont (name: "System-Heavy", size: 15)
        break
    }
}
We also need to set the url for the video file in the settings before capturing the photo.
if self.live == .On {
    let path = "\(NSTemporaryDirectory())/Photoshot_\(settings.uniqueID)"
    settings.livePhotoMovieFileURL = URL(fileURLWithPath: path)
}
Conclusion
AVCapturePhotoOutput has made it simple to implement camera functions in your app. This article was a short introduction to how to use some these functions.
I hope you find it interesting and helpful.
May the Code be with you.