There are different ways an app can interact with a user. Windows Phone has a unique way of giving the latest information, even when the app is not running, through tiles and badges. This saves battery and is a user friendly experience. Whether a new email, missed call, special event in the calendar, photos in your contact list, or your personal photos, the design of Windows Phone makes it easy to let you know something new has arrived. In this article I will show how to implement these notifications into your app.
You can download the full project from GitHub.
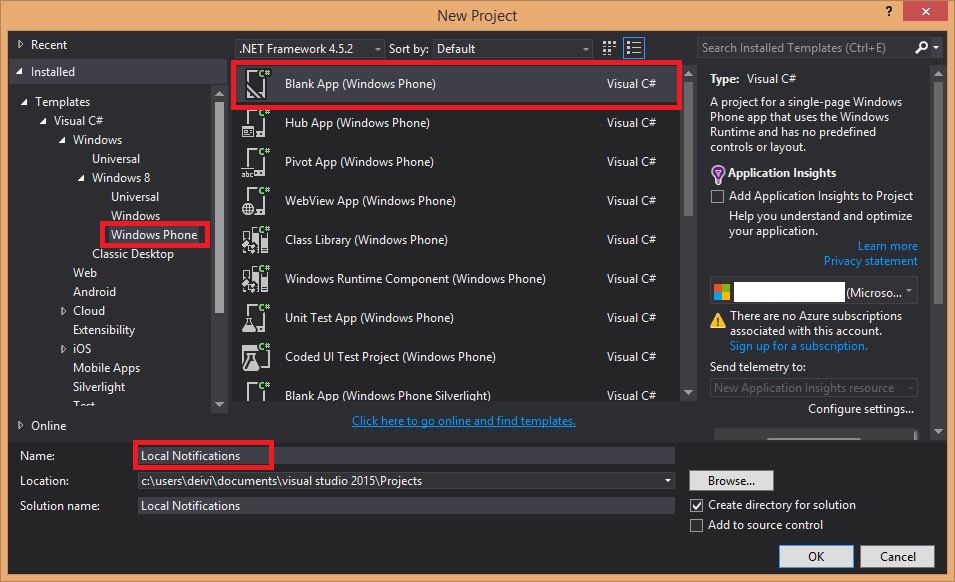
To get started, create a new project in Visual Studio, select Windows Phone from the list and name the project.
Open MainPage.xaml and add the following code within the grid tags.
<ScrollViewer Margin="0,0,0,-1">
    <StackPanel>
        <StackPanel>
            <TextBlock FontSize="20" Text="Image and Text"/>
            <ToggleSwitch x:Name="ImageAndText" HorizontalAlignment="Left" Margin="0,0,0,10"/>
        </StackPanel>
        <StackPanel>
            <TextBlock FontSize="20" Text="Image Collection"/>
            <ToggleSwitch x:Name="ImageCollection" HorizontalAlignment="Left" Margin="0,0,0,10"/>
        </StackPanel>
        <StackPanel>
            <TextBlock FontSize="20" Text="Cyclic"/>
            <ToggleSwitch x:Name="Cyclic" HorizontalAlignment="Left" Margin="0,0,0,10"/>
        </StackPanel>
        <StackPanel>
            <TextBlock FontSize="20" Text="Badge"/>
            <ToggleSwitch x:Name="Badge" HorizontalAlignment="Left" Margin="0,0,0,10" FontFamily="Global User Interface"/>
        </StackPanel>
        <StackPanel>
            <TextBlock FontSize="20" Text="Iconic Tile"/>
            <ToggleSwitch x:Name="IconicTile" HorizontalAlignment="Left" Margin="0,0,0,10"/>
        </StackPanel>
        <StackPanel>
            <TextBlock FontSize="20" Text="Block and Text"/>
            <ToggleSwitch x:Name="BlockAndText" HorizontalAlignment="Left" Margin="0,0,0,10"/>
        </StackPanel>
    </StackPanel>
</ScrollViewer>
The design view should now look like this:
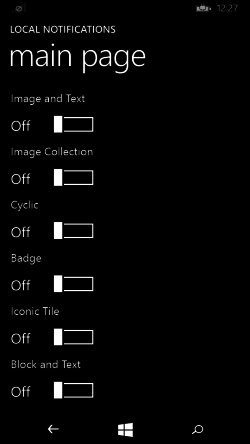
You’ll see a list of toggle switches that will activate our notifications. Now to add the code that makes something happen.
Before We Start
To make the next steps simpler we import some namespaces into MainPage.xaml.cs.
using Windows.UI.StartScreen;
using Windows.Data.Xml.Dom;
using Windows.UI.StartScreen;
using Windows.UI.Xaml;
Inside the MainPage class declare these global variables, not all will be used right away.
private XmlDocument tileXml;
private XmlElement tileImage;
private XmlNodeList tileList;
private TileNotification notif;
SecondaryTile imageTile, blockTile, badgeTile, iconicTile, cyclicTile;
We need to enable the notification queue for the main tile of the application. Do this inside the constructor, so the code executes when the page is created.
TileUpdateManager.CreateTileUpdaterForApplication().EnableNotificationQueueForSquare150x150(true);
                    TileUpdateManager.CreateTileUpdaterForApplication().EnableNotificationQueueForWide310x150(true);
I have pinned the app to start menu and re-sized it to the wide size (310×150). Then I programmatically added a secondary square tile for every template. I recommend you do the same, as we will test notifications on both wide and square tiles and this saves time re-sizing them to see the differences during testing.
Secondary Tiles
I will introduce Secondary tiles first, because we will use them in later steps. They are identical to the tiles pinned to the start menu, except that they are created programmatically. We can create multiple tiles, assign them different ids and then update them separately. In Windows Phone 8.1 we can only add square tiles of 150×150 pixels.
To create a secondary tile a class with the same name is used from the StartScreen namespace. The objects are created through the following constructor.
SecondaryTile.SecondaryTile(string tileId, string displayName, string arguments, Uri logoReference, TileSize tileSize);
To pin the tile to the start menu we call the asynchronous method SecondaryTile.RequestCreateAsync(); which returns a boolean to tell whether the tile has pinned with success or not. Removing a pinned tile is as easy as calling SecondaryTile.RequestDeleteAsync();
Flip Tiles
This tile type is common in games. If you pin the app to the Start menu, the tile will update with information on a leaderboard, achievements, or other game-specific information.
In the design view of MainPage.xaml, double clicking the ImageAndText toggle switch will add the toggled event listener and will take you to the .cs file creating a new method where we will add our code. First we need to check if the switch that triggered the event is On or Off to perform the right action, a simple if else statement is sufficient. Note the async keyword added to support asynchronous calls.
private async void ImageAndText_Toggled(object sender, RoutedEventArgs e)
{
    if (ImageAndText.IsOn)
    {
    }
    else
    {
    }
}
If the switch turns on, I create a secondary tile, as described above, and pin it to the start menu. I have added five colored rectangles to the project with two sizes each. In this case the tile will use a blue rectangle as an image.
imageTile = new SecondaryTile(
"ImageAndText",
"Image and Text",
"Arguments",
new Uri("ms-appx:///Assets/blue.150x150.png", UriKind.Absolute),
TileSize.Square150x150);
await imageTile.RequestCreateAsync();
If the switch turns off, we have to remove the pinned tile, adding the following line inside the else block.
await imageTile.RequestDeleteAsync();
If you run the app now and turn the image and text switch on, you will see two tiles side by side. The first is wide and named Local Notifications and the second is square and named Image and Text. We haven’t added any notifications yet.
Notification templates are in xml, but can be generated through code. This is the template we will use.
<tile>
    <visual version="2">
        <binding template="TileSquare150x150PeekImageAndText01" fallback="TileSquarePeekImageAndText01">
            <image id="1" src="" />
            <text id="1"></text>
            <text id="2"></text>
            <text id="3"></text>
            <text id="4"></text>
        </binding>
    </visual>
</tile>
Next we get this template from TileUpdateManager. You may notice that there are plenty of other TileTemplateTypes available, used both for Windows and Windows Phone.
tileXml = TileUpdateManager.GetTemplateContent( TileTemplateType.TileSquare150x150PeekImageAndText01 );
In the xml code there is one image tag missing a source and four text tags missing text. We can get any xml element from its tag name and then set the attributes we need. The GetElementsByTagName(string) function returns a XmlNodeList containing all elements found in the document. Let’s add attributes for the image and text.
tileImage = tileXml.GetElementsByTagName("image")[0] as XmlElement;
tileImage.SetAttribute("src", "ms-appx:///Assets/blue.150x150.png");

tileList = tileXml.GetElementsByTagName("text");
(tileList[0] as XmlElement).InnerText = "Header text";
(tileList[1] as XmlElement).InnerText = "First line of text";
(tileList[2] as XmlElement).InnerText = "Second line of text";
(tileList[3] as XmlElement).InnerText = "Third line of text";
Based on this xml template we create a TileNotification and add it to the TileUpdateManager, which is responsible for changing or updating tiles.
notif = new TileNotification(tileXml);
TileUpdateManager.CreateTileUpdaterForSecondaryTile(imageTile.TileId).Update(notif);
The secondary tile update is now complete. We will also update the wide tile with minor changes. First, we get the template for the wide tile.
tileXml = TileUpdateManager.GetTemplateContent( TileTemplateType.TileWide310x150PeekImage02 );
The source of the image is set to the wide blue rectangle.
tileImage.SetAttribute("src", "ms-appx:///Assets/blue.310x150.png");
The template for the wide tile has an extra line of text, we can add attributes for that too.
(tileList[4] as XmlElement).InnerText = "Fourth line of text";
Finally, we update the main tile.
TileUpdateManager.CreateTileUpdaterForApplication().Update(notif);
When the toggle is switched off, the tile updates are cleared:
TileUpdateManager.CreateTileUpdaterForApplication().Clear();
In the example project on github the code is repeated in every case, which is not efficient, but shows each notification more clearly.
Run the app and switch on the first toggle. You should see this in the Start menu.
Cycle like Tiles
If you look at the Photos tile, your personal photos are slowly cycled and switched with the Ken Burns effect. This is called a ‘Cycle tile’. In Windows Phone 8.1 this tile is no longer available any more, but we can do something similar. One approach is adding pictures to a queuethat will switch with a flip effect, but the movement will be missing.
Create a new Secondary tile the same way we did before.
cyclicTile = new SecondaryTile(
"Cyclic",
"Cyclic",
"Arguments",
new Uri("ms-appx:///Assets/blue.150x150.png", UriKind.Absolute),
TileSize.Square150x150);
await cyclicTile.RequestCreateAsync();
We need to enable a notification queue for this tile as we did for the primary tile.
TileUpdateManager.CreateTileUpdaterForSecondaryTile(cyclicTile.TileId).EnableNotificationQueueForSquare150x150(true);
Update the tile using the TileSquare150x150Image template changing only the image source.
tileImage = tileXml.GetElementsByTagName("image")[0] as XmlElement;

tileImage.SetAttribute("src", "ms-appx:///Assets/blue.150x150.png");
notif = new TileNotification(tileXml);
TileUpdateManager.CreateTileUpdaterForSecondaryTile(cyclicTile.TileId).Update(notif);

tileImage.SetAttribute("src", "ms-appx:///Assets/red.150x150.png");
notif = new TileNotification(tileXml);
TileUpdateManager.CreateTileUpdaterForSecondaryTile(cyclicTile.TileId).Update(notif);

// Repeat for orange, green, and yellow
In the same way, update the wide tile using TileWide310x150Image as a template type. The following gif shows how the tiles will look.
Badges
A counter or ‘badge’ is often used to show the number of notifications. It can be a glyph, but in Windows Phone is limited to an alert and attention symbol. We will use glyphs in the secondary tile and a badge with numbers in the primary tile.
After creating and pinning a new tile, we generate the xml from the BadgeUpdateManager class.
tileXml = BadgeUpdateManager.GetTemplateContent(BadgeTemplateType.BadgeGlyph);
The xml consists only of one tag: <badge value=""/>. Next set the value of the Glyph.
tileImage = tileXml.SelectSingleNode("/badge") as XmlElement;
tileImage.SetAttribute("value", "alert");
Create a new BadgeNotification from this template and update the tile.
BadgeNotification badgeNotification = new BadgeNotification(tileXml); BadgeUpdateManager.CreateBadgeUpdaterForSecondaryTile(badgeTile.TileId).Update(badgeNotification);
The wide tile is updated in a similar way.
tileXml = BadgeUpdateManager.GetTemplateContent( BadgeTemplateType.BadgeNumber );
tileImage = tileXml.SelectSingleNode("/badge") as XmlElement;
tileImage.SetAttribute("value", "31");
badgeNotification = new BadgeNotification(tileXml);
BadgeUpdateManager.CreateBadgeUpdaterForApplication().Update(badgeNotification);
When the user opens the app, we might want to clear this notification by adding this function to the toggle event handler.
BadgeUpdateManager.CreateBadgeUpdaterForApplication().Clear();
Run the application to see the results.
The black circle might look disappointing at first, but don’t give up on them just yet, badges have more to them.
Lock Screen Notifications
When the phone is locked and a user presses the power button they can immediately see notifications for apps of their choice. We can enable this feature for our app too in case a user doesn’t have a tile pinned to the start menu.
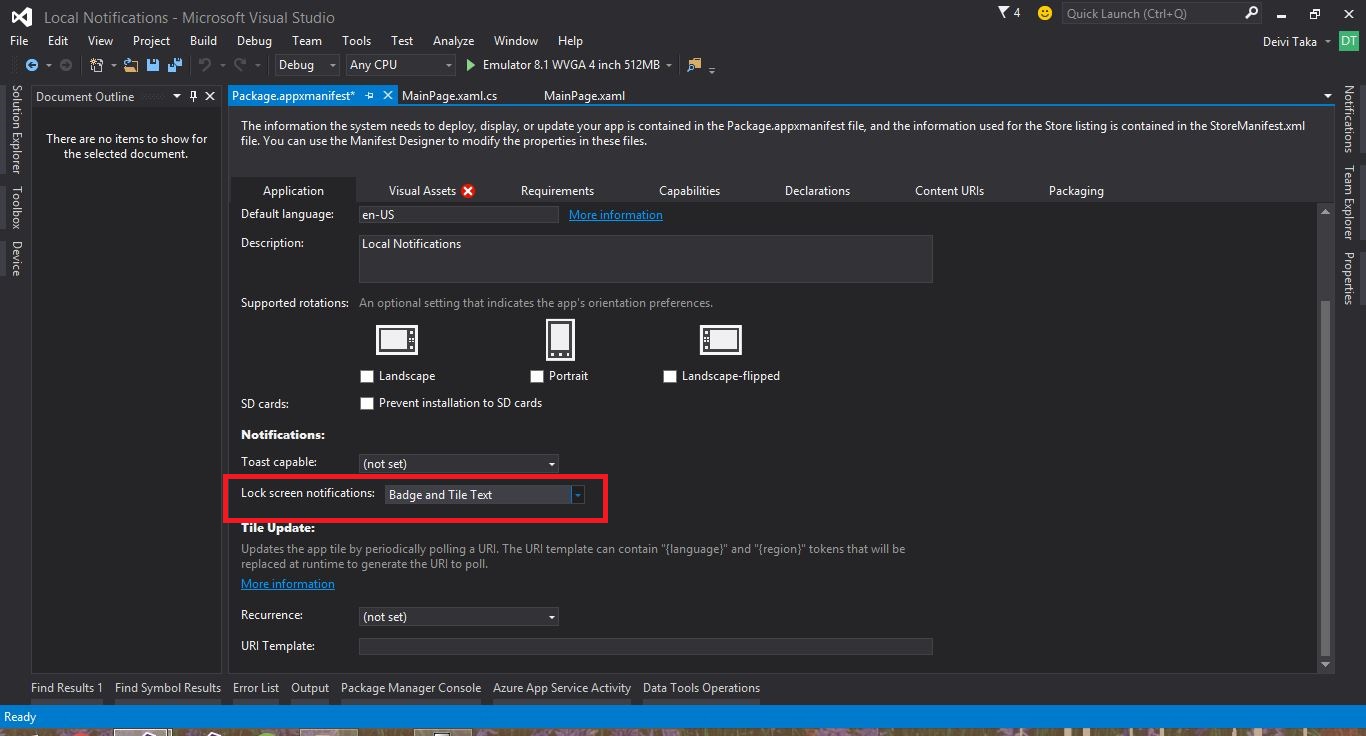
Open the package.appxmanifest of the project and in Lock screen notifications select Badge and Tile Text.
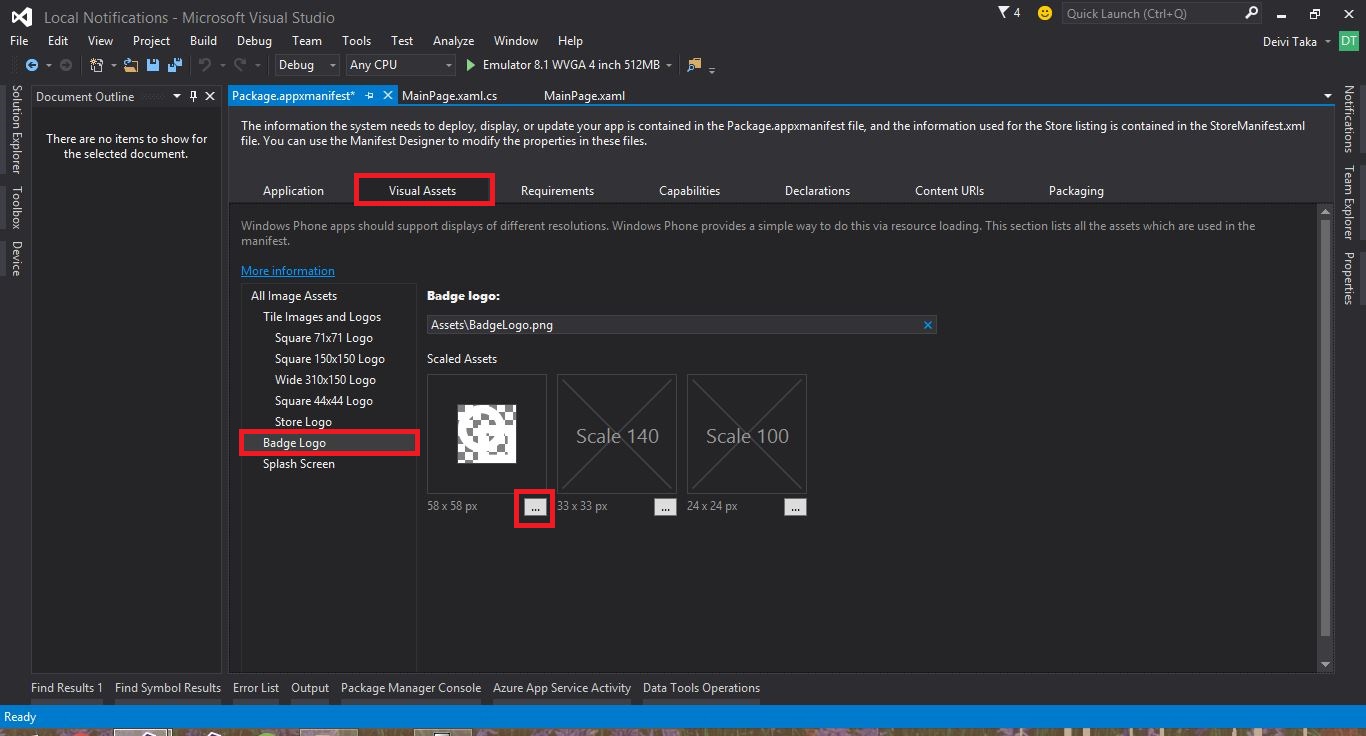
A red mark will appear in the Visual Assets tab because we need to add a badge logo. Click on the tab and on the left pane select Badge Logo. You can upload up to three different sizes: 58×58, 33×33 and 24×24. The logo is best white with a transparent background. Choose the logo and save changes.
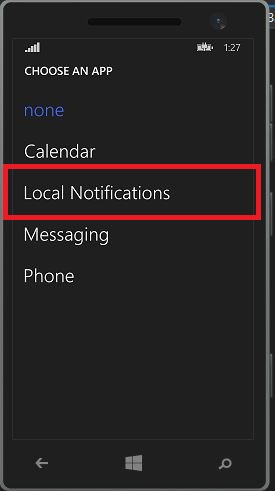
We may have added notification functionality to our app, but it’s the users choice whether to enable them or add tiles to the start screen. To enable app notifications open Settings -> LockScreen. By default there should be at least Phone and Messaging already selected. Add another app by pressing the + button.
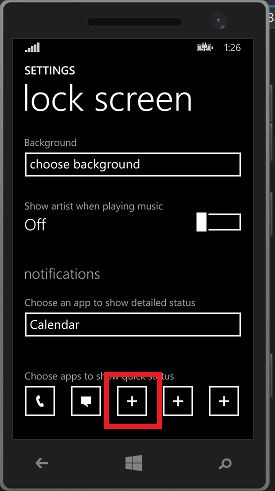
This will show a list of apps that offer lock screen notifications, choose our app and move on.
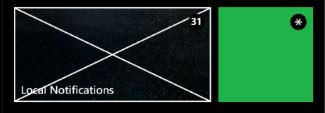
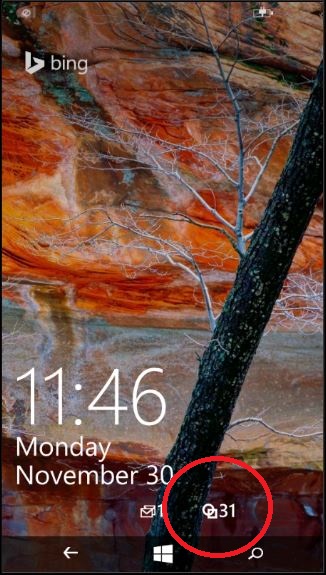
If you lock the screen and the badge notification is still on, you should now see 31 new notifications for our app.
Iconic Tiles
The last form that badges can take are ‘Iconic Tiles’. One example is the Mail tile, giving information on the newly arrived email, the sender, the time and in the bottom right corner, a small icon shows how many unread emails you have.
First we need to add an icon to the project assets. For the wide tile, it should be 70×110 pixels, and for the square tile 130×202 pixels.
The code behind the tile has the same logic. Create a new Secondary tile and add a badge to it. We need a number to show next to the icon, which will be the number we set on the badge. Then get the xml code to generate a TileNotification.
tileXml = TileUpdateManager.GetTemplateContent(TileTemplateType.TileSquare150x150IconWithBadge);
tileImage = tileXml.GetElementsByTagName("image")[0] as XmlElement;
tileImage.SetAttribute("src", "ms-appx:///Assets/icon.130x202.png");

notif = new TileNotification(tileXml);
TileUpdateManager.CreateTileUpdaterForSecondaryTile(iconicTile.TileId).Update(notif);
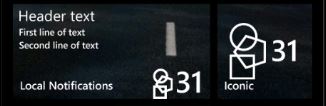
Do the same for the wide tile, but the xml template has three text tags that need attributes added.
tileList = tileXml.GetElementsByTagName("text");
(tileList[0] as XmlElement).InnerText = "Header text";
(tileList[1] as XmlElement).InnerText = "First line of text";
(tileList[2] as XmlElement).InnerText = "Second line of text";
Which should look like this.
Block and Text Template
The last example I would like to show is the Calendar tile update. On special events it updates with the event name and its duration.
There is a specific template for the square tile and two templates available for the wide tile. After creating a secondary tile, get the xml template. It has two text tags to add attributes to, in this case the month and the date.
tileXml = TileUpdateManager.GetTemplateContent( TileTemplateType.TileSquare150x150Block );

tileList = tileXml.GetElementsByTagName("text");
(tileList[0] as XmlElement).InnerText = "28";
(tileList[1] as XmlElement).InnerText = "Nov";
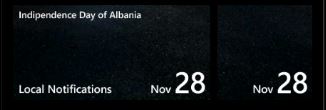
For the wide tile there are one or two extra text tags, depending on the template where you can add information about the event.
tileXml = TileUpdateManager.GetTemplateContent( TileTemplateType.TileWide310x150BlockAndText01 );

tileList = tileXml.GetElementsByTagName("text");
(tileList[0] as XmlElement).InnerText = "28";
(tileList[1] as XmlElement).InnerText = "Nov";
(tileList[2] as XmlElement).InnerText = "Indipendence Day of Albania";
When you add the TileNotifications to each of the tiles you should get a similiar result.
Conclusion
Tiles are a good way to notify users of new activity in your app. In this article I showed some of the most common tile updates, based on the existing types that Windows uses for its apps. Windows Phone 8.1 and above has changed the way these tiles are implemented, so I hope my explanations were clear enough.
Thank you for your time. May Code be with you!