Passwords have had their day, with software vendors and hardware manufacturers encouraging users to try other methods of securing their data. Fingerprint readers are becoming more common on Android devices since Marshmallow introduced a new Fingerprint API and in this tutorial I will show you how to implement them in your apps.
You can download the full project from GitHub.
Getting Started
This is an example application, limited in user experience, and will focus on the ‘how to’.
To get started, create a new project and name it ‘FingerprintApi’. Set API level 15 as the Minimum SDK, and add a Login Activity. Click Finish, and Android Studio will start creating the necessary files.

The LoginActivity will help get started quicker, but changes are still needed.
In activity_login.xml change the Sign in or Register button label to Register, and add another button labeled Sign in using Fingerprint. Below this, add a TextView named noteTextView. Debug information will be printed here, instead of using dialogues.
<Button
    style="?android:textAppearanceSmall"
    android:id="@+id/fingerprint_sign_in_button"
    android:layout_width="match_parent"
    android:layout_height="wrap_content"
    android:layout_marginTop="16dp"
    android:text="Sign in using Fingerprint"
    android:textStyle="bold" />

<TextView
    android:layout_width="match_parent"
    android:layout_height="match_parent"
    android:id="@+id/noteTextView"
    android:layout_gravity="center_horizontal"
    android:layout_margin="20dp"
    android:textAlignment="center" />
In LoginActivity.java, replace the existing variables with the below, which you will use later.
private static final int REQUEST_READ_CONTACTS = 0;

private AutoCompleteTextView mEmailView;
private EditText mPasswordView;
private View mProgressView;
private View mLoginFormView;
private TextView mNoteTextView;

private UserLoginTask mAuthTask;

private static final String KEY_ALIAS = "sitepoint";
private static final String KEYSTORE = "AndroidKeyStore";
private static final String PREFERENCES_KEY_EMAIL = "email";
private static final String PREFERENCES_KEY_PASS = "pass";
private static final String PREFERENCES_KEY_IV = "iv";

private KeyStore keyStore;
private KeyGenerator generator;
private Cipher cipher;
private FingerprintManager fingerprintManager;
private KeyguardManager keyguardManager;
private FingerprintManager.CryptoObject cryptoObject;
private SharedPreferences sharedPreferences;

private boolean encrypting;
Replace the onCreate method with the one below.
@Override
protected void onCreate(Bundle savedInstanceState) {
    super.onCreate(savedInstanceState);
    setContentView(R.layout.activity_login);
    // Set up the login form.
    mEmailView = (AutoCompleteTextView) findViewById(R.id.email);
    populateAutoComplete();

    mPasswordView = (EditText) findViewById(R.id.password);
    mPasswordView.setOnEditorActionListener(new TextView.OnEditorActionListener() {
        @Override
        public boolean onEditorAction(TextView textView, int id, KeyEvent keyEvent) {
            if (id == R.id.login || id == EditorInfo.IME_NULL) {
                //attemptRegister();
                return true;
            }
            return false;
        }
    });

    Button mRegisterButton = (Button) findViewById(R.id.email_sign_in_button);
    mRegisterButton.setOnClickListener(new OnClickListener() {
        @Override
        public void onClick(View view) {
            //attemptRegister();
        }
    });
    Button mFingerprintSignInButton = (Button) findViewById(R.id.fingerprint_sign_in_button);
    mFingerprintSignInButton.setOnClickListener(new OnClickListener() {
        @Override
        public void onClick(View view) {
            //attemptFingerprintLogin();
        }
    });

    mLoginFormView = findViewById(R.id.login_form);
    mProgressView = findViewById(R.id.login_progress);

    mNoteTextView = (TextView)findViewById(R.id.noteTextView);

    sharedPreferences = PreferenceManager.getDefaultSharedPreferences(this);
}
This renames the attemptLogin() method to attemptRegister(), declares and initialized variables for fingerprintSignInButton, and noteTextView. initialize sharedPreferences, where you save the users’ credentials, including the encrypted password.
To add text to noteTextView add these two methods. The text is passed as a parameter, and added at the top of the TextView.
public void print(String text) {
    mNoteTextView.setText(text + "\n" + mNoteTextView.getText());
}

public void print(int id) {
    print(getString(id));
}
In the UserLoginTask class, remove the code inside the doInBackground and onPostExecute methods, leaving the below.
@Override
protected Boolean doInBackground(Void... params) {
    return true;
}

@Override
protected void onPostExecute(final Boolean success) {
    onCancelled();
}
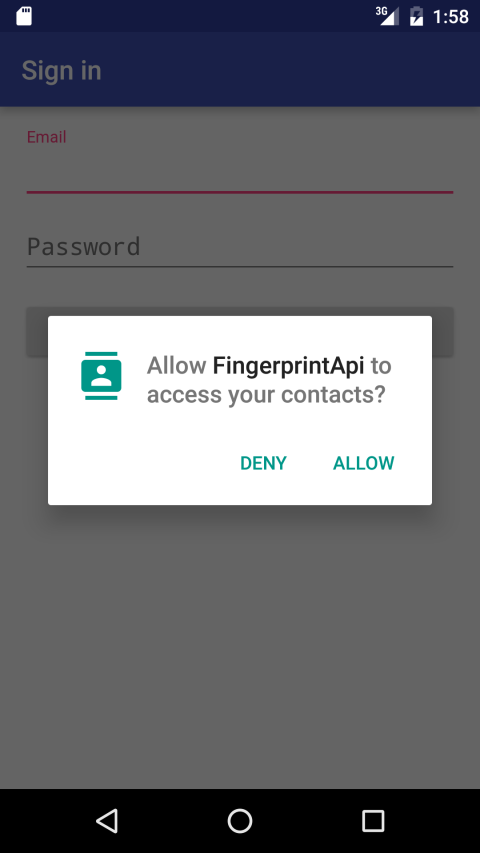
For a first run the app will require permission to access contacts, but this is irrelevant. It’s included in the default LoginActivity implementation, which you can delete in this case.
If Statements
To use the Fingerprint API, you must request permission. Add this line to AndroidManifest.xml at the top of the application tag.
<uses-permission android:name="android.permission.USE_FINGERPRINT" />
Of course, not every device has a fingerprint sensor, or Android 6.0 and higher. Because of this, you should check for hardware/software support before attempting to use the API methods, which might throw an exception.
@SuppressLint("NewApi") private boolean testFingerPrintSettings() { print("Testing Fingerprint Settings");

if (Build.VERSION.SDK_INT < Build.VERSION_CODES.M)
{
    print("This Android version does not support fingerprint authentication.");
    return false;
}

keyguardManager = (KeyguardManager) getSystemService(KEYGUARD_SERVICE);
fingerprintManager = (FingerprintManager) getSystemService(FINGERPRINT_SERVICE);

if (Build.VERSION.SDK_INT >= Build.VERSION_CODES.JELLY_BEAN) {
    if (!keyguardManager.isKeyguardSecure()) {
        print("User hasn't enabled Lock Screen");
        return false;
    }
}

if (ActivityCompat.checkSelfPermission(this, Manifest.permission.USE_FINGERPRINT) != PackageManager.PERMISSION_GRANTED) {
    print("User hasn't granted permission to use Fingerprint");
    return false;
}

if (!fingerprintManager.hasEnrolledFingerprints()) {
    print("User hasn't registered any fingerprints");
    return false;
}

print("Fingerprint authentication is set.\n");

return true;

}
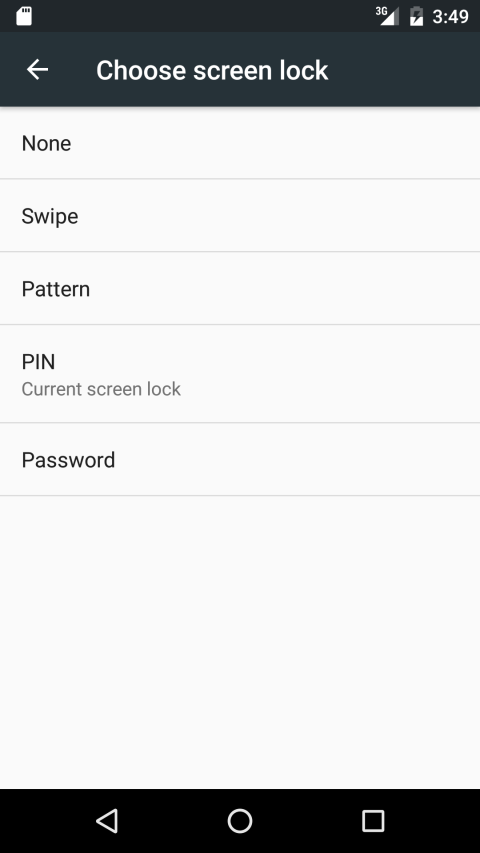
This first checks for a minimum version of Android M. Then it checks that the user has enabled Screen Lock with Pattern, PIN, or Password with the isKeyguardSecure() method.
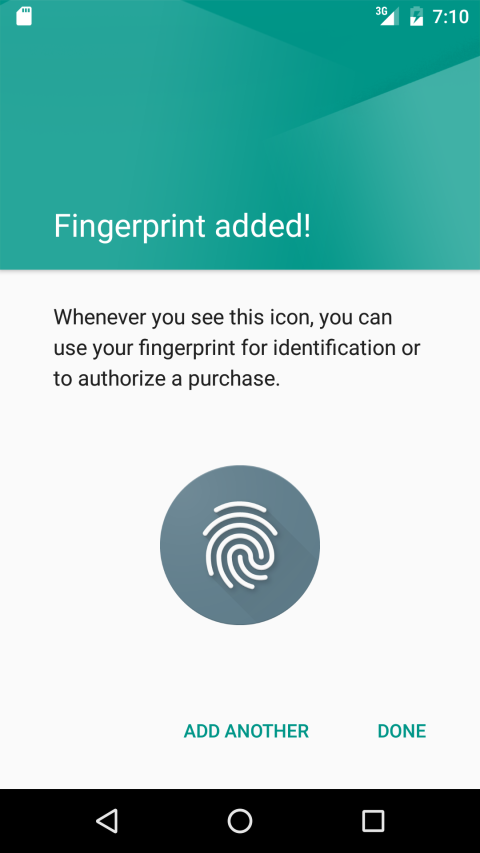
Besides having enabled Screen Lock, a user must have a fingerprint registered on the device, you can check for this with the hasEnrolledFingerprints method, but it requires that the permission to use fingerprint authentication is explicitly checked.
If all the checks pass, the method returns true.
Another thing to check is whether a registered user is trying to sign in. The first place to look is the SharedPreferences.
private boolean usersRegistered() {
    if (sharedPreferences.getString(PREFERENCES_KEY_EMAIL, null) == null) {
        print("No user is registered");
        return false;
    }

    return true;
}
The Helper Class
Next you need a helper class to handle the Fingerprint API methods. Right-click on the current package, then click New -> Java class. Name the new class FingerprintHelper and have it extend FingerprintManager.AuthenticationCallback. The class needs to target an API greater or equal to Android M, do this by adding @TargetApi(Build.VERSION_CODES.M) to the top of the class:
@TargetApi(Build.VERSION_CODES.M)
public class FingerprintHelper extends FingerprintManager.AuthenticationCallback {
  ...
}
Declare an inner interface with the following methods.
interface FingerprintHelperListener {
    public void authenticationFailed(String error);
    public void authenticationSucceeded(FingerprintManager.AuthenticationResult result);
}
All classes that will use FingerprintHelper must implement this interface to notify about the status of the authentication. To be able to call these methods, you need an instance of the calling class, taken as a parameter in the constructor.
private FingerprintHelperListener listener;

public FingerprintHelper(FingerprintHelperListener listener) {
    this.listener = listener;
}
For the fingerprint scanner to start listening for input, call the FingerprintManager method authenticate. You use CancellationSignal to stop listening when the user cancels the authentication, or when the application goes into the background, etc.
This method allows other classes to cancel the call:
private CancellationSignal cancellationSignal;

public void startAuth(FingerprintManager manager, FingerprintManager.CryptoObject cryptoObject) {
    cancellationSignal = new CancellationSignal();

    try {
        manager.authenticate(cryptoObject, cancellationSignal, 0, this, null);
    } catch (SecurityException ex) {
        listener.authenticationFailed("An error occurred:\n" + ex.getMessage());
    } catch (Exception ex) {
        listener.authenticationFailed("An error occurred\n" + ex.getMessage());
    }
}

public void cancel() {
    if (cancellationSignal != null)
        cancellationSignal.cancel();
}
The method authenticate uses a CryptoObject object, this is a wrapper class for the crypto objects supported by FingerprintManager. It contains objects like Cipher and Signature, for this tutorial, I will use Cipher to handle encryption and decryption.
Finally, override the AuthenticationCallback methods to notify the FingerprintHelperListener.
@Override
public void onAuthenticationError(int errMsgId, CharSequence errString) {
    listener.authenticationFailed("Authentication error\n" + errString);
}

@Override
public void onAuthenticationHelp(int helpMsgId, CharSequence helpString) {
    listener.authenticationFailed("Authentication help\n" + helpString);
}

@Override
public void onAuthenticationFailed() {
    listener.authenticationFailed("Authentication failed.");
}

@Override
public void onAuthenticationSucceeded(FingerprintManager.AuthenticationResult result) {
    listener.authenticationSucceeded(result);
}
I will mention these methods when I talk about test cases, but for now the helper class is ready to use.
Testing Authentication
Before saving the credentials, there are still a couple of steps to take. Back to LoginActivity, add FingerprintHelper.FingerprintHelperListener after implements LoaderCallbacks<Cursor> and implement the two methods of the interface.
@Override
public void authenticationFailed(String error) {
    print(error);
}

@TargetApi(Build.VERSION_CODES.M)
@Override
public void authenticationSucceeded(FingerprintManager.AuthenticationResult result) {
    print("Authentication succeeded!");
}
The TargetApi specifies a minimum Android version for the methods that will be called inside authenticationSucceeded. Uncomment the calls to the attemptRegister() method inside onCreate and add these line to that method.
if (!testFingerPrintSettings())
    return;
Declare a variable of type FingerprintHelper in the class variables.
private FingerprintHelper fingerprintHelper;
Override the onPause method to stop tasks if for some reason the activity enters this condition.
@Override
protected void onPause() {
    super.onPause();

    if (fingerprintHelper != null)
        fingerprintHelper.cancel();

    if (mAuthTask != null)
        mAuthTask.cancel(true);
}
Update the UserLoginTask constructor and add another variable as following.
private final Boolean mRegister; // if false, authenticate instead

UserLoginTask(String email, String password) {
    mEmail = email;
    mPassword = password;
    mRegister = true;
    fingerprintHelper = new FingerprintHelper(LoginActivity.this);
}
In addition to initializing the fingerprintHelper object, use a boolean to tell if the Fingerprint api is used for registration, or authentication.
Update the onPostExecute method, so that it asks for authentication from the user.
@Override
protected void onPostExecute(final Boolean success) {
    onCancelled();

    if (!success) {
        if (mRegister)
            print(R.string.register_fail);
        else
            print(R.string.fingerprint_authenticate_fail);
    } else {
        fingerprintHelper.startAuth(LoginActivity.this.fingerprintManager, cryptoObject);
        print("Authenticate using fingerprint!");
    }
}
Add these resources to the string.xml file.
<string name="fingerprint_authenticate_success">Successfully authenticated!</string>
<string name="register_success">Successfully registered!</string>
<string name="fingerprint_authenticate_fail">Authentication failed!</string>
<string name="register_fail">Registration failed!</string>
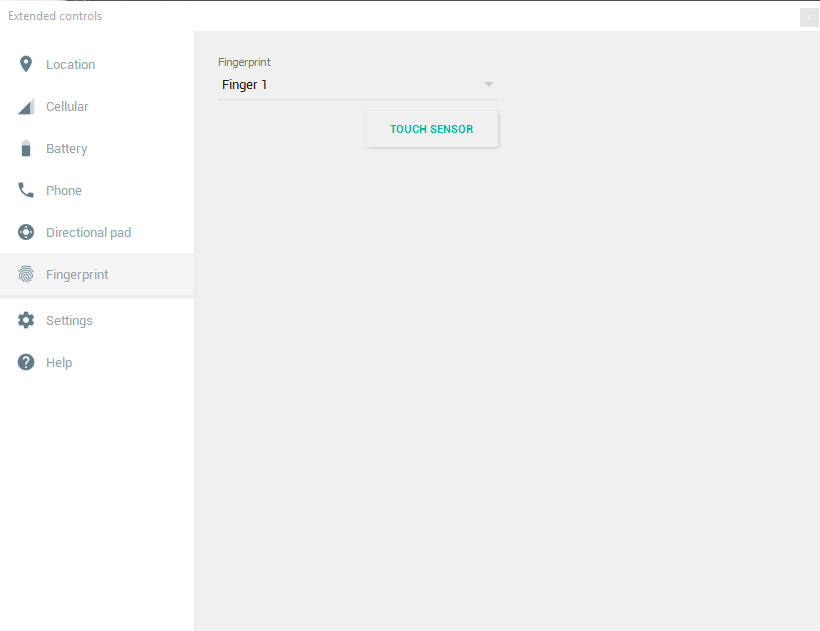
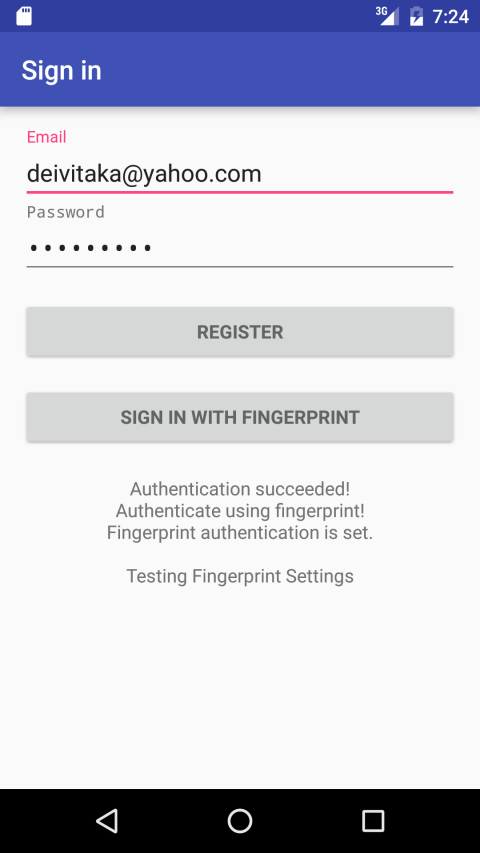
At this point, the fingerprint authentication is ready for a try. Run the app, enter credentials, and click register. The app will display “Authenticate using fingerprint!” if everything is set on your device or emulator. To simulate a fingerprint in the android emulator, open the Extended Tools by clicking More on the right panel, then select Fingerprint from the menu. The window will be as follows.
On successful authentication the view will be as follows.
Now let’s save those credentials.
Saving Credentials
I will update the doInBackground method step by step, with calls to new functions. If any of these calls fail, the process is interrupted.
if (!getKeyStore())
    return false;

private boolean getKeyStore() {
    print("Getting keystore...");
    try {
        keyStore = KeyStore.getInstance(KEYSTORE);
        keyStore.load(null); // Create empty keystore
        return true;
    } catch (KeyStoreException e) {
        print(e.getMessage());
    } catch (CertificateException e) {
        print(e.getMessage());
    } catch (NoSuchAlgorithmException e) {
        print(e.getMessage());
    } catch (IOException e) {
        print(e.getMessage());
    }

    return false;
}
The KeyStore is a database-like storage of keys and certificates. Each entry is identified by a string called ‘alias’, but to access it you must first load a specific keystore. I have named mine ‘AndroidKeyStore’.
if (!createNewKey(false))
    return false;


@TargetApi(Build.VERSION_CODES.M)
public boolean createNewKey(boolean forceCreate) {
  print("Creating new key...");
  try {
  if (forceCreate)
          keyStore.deleteEntry(KEY_ALIAS);

      if (!keyStore.containsAlias(KEY_ALIAS)) {
          generator = KeyGenerator.getInstance(KeyProperties.KEY_ALGORITHM_AES, KEYSTORE);

          generator.init(new KeyGenParameterSpec.Builder (KEY_ALIAS,
                  KeyProperties.PURPOSE_ENCRYPT | KeyProperties.PURPOSE_DECRYPT)
                  .setBlockModes(KeyProperties.BLOCK_MODE_CBC)
                  .setEncryptionPaddings(KeyProperties.ENCRYPTION_PADDING_PKCS7)
                  .setUserAuthenticationRequired(true)
                  .build()
          );

          generator.generateKey();
          print("Key created.");
      } else
          print("Key exists.");

      return true;
  } catch (Exception e) {
      print(e.getMessage());
  }

  return false;
}
As the keystore was just created, it contains no aliases. This method creates one in case it does not already exist. KeyGenerator generates a new key with the given properties. When initializing the KeyGenerator the .setUserAuthenticationRequired(true) method is called, which makes the key available if the user has been identified.
if (!getCipher())
    return false;

private boolean getCipher() {
    print("Getting cipher...");
    try {
        cipher = Cipher.getInstance(
                KeyProperties.KEY_ALGORITHM_AES + "/"
                + KeyProperties.BLOCK_MODE_CBC + "/"
                + KeyProperties.ENCRYPTION_PADDING_PKCS7);

        return true;
    } catch (NoSuchAlgorithmException e) {
        print(e.getMessage());
    } catch (NoSuchPaddingException e) {
        print(e.getMessage());
    }

    return false;
}
The Cipher is responsible for encryption and decryption, so expects the algorithm to use as a parameter.
if (mRegister) {
    SharedPreferences.Editor editor = sharedPreferences.edit();
    editor.putString(PREFERENCES_KEY_EMAIL, mEmail);
    editor.commit();

    encrypting = true;

    if (!initCipher(Cipher.ENCRYPT_MODE))
        return false;
}

@TargetApi(Build.VERSION_CODES.M)
private boolean initCipher(int mode) {
    print("Initializing cipher...");
    try {
        keyStore.load(null);
        SecretKey keyspec = (SecretKey)keyStore.getKey(KEY_ALIAS, null);

        if (mode == Cipher.ENCRYPT_MODE) {
            cipher.init(mode, keyspec);

            SharedPreferences.Editor editor = sharedPreferences.edit();
            editor.putString(PREFERENCES_KEY_IV, Base64.encodeToString(cipher.getIV(), Base64.NO_WRAP));
            editor.commit();
        }

        return true;
    } catch (KeyPermanentlyInvalidatedException e) {
        print(e.getMessage());
        createNewKey(true); // Retry after clearing entry
    } catch (Exception e) {
        print(e.getMessage());
    }

    return false;
}
When registering, you need to save the email. I am using sharedPreferences, but depending on the implementation, you could use a database. Then set encryption to true, and initialize the Cipher in encryption mode.
The cipher will take the generated SecretKey as a parameter when initialized. In sharedPreferences save the Init Vector (IV), from Cipher. IV is the salt for the password encryption. It’s randomly generated every time a new password is encrypted, so is safe to save it as a Base64 encoded string.
The KeyPermanentlyInvalidatedException will occur when the key becomes invalid. Clearing the KeyStore entry with that alias will solve the problem.
...
if (!initCryptObject())
    return false;

return true;
//end of doInBackground
}

@TargetApi(Build.VERSION_CODES.M)
private boolean initCryptObject() {
    print("Initializing crypt object...");
    try {
        cryptoObject = new FingerprintManager.CryptoObject(cipher);
        return true;
    } catch (Exception ex) {
        print(ex.getMessage());
    }
    return false;
}
The last step is to initialize a CryptoObject from Cipher, and all the object initialization. You have saved the email and IV, only the password remains.
When the user successfully authenticates using a fingerprint, encrypt the password and save it. Update the method authenticationSucceeded from the FingerprintHelperListener.
@TargetApi(Build.VERSION_CODES.M)
@Override
public void authenticationSucceeded(FingerprintManager.AuthenticationResult result) {
  print("Authentication succeeded!");
  cipher = result.getCryptoObject().getCipher();

  if (encrypting) {
      String textToEncrypt = mPasswordView.getText().toString();
      encryptString(textToEncrypt);
      print(R.string.register_success);

      mEmailView.setText("");
      mPasswordView.setText("");
  }
}

public void encryptString(String initialText) {
  print("Encrypting...");
  try {
      byte[] bytes = cipher.doFinal(initialText.getBytes());
      String encryptedText = Base64.encodeToString(bytes, Base64.NO_WRAP);

      SharedPreferences.Editor editor = sharedPreferences.edit();
      editor.putString(PREFERENCES_KEY_PASS, encryptedText);
      editor.commit();

      } catch (Exception e) {
          print(e.getMessage());
      }
  }
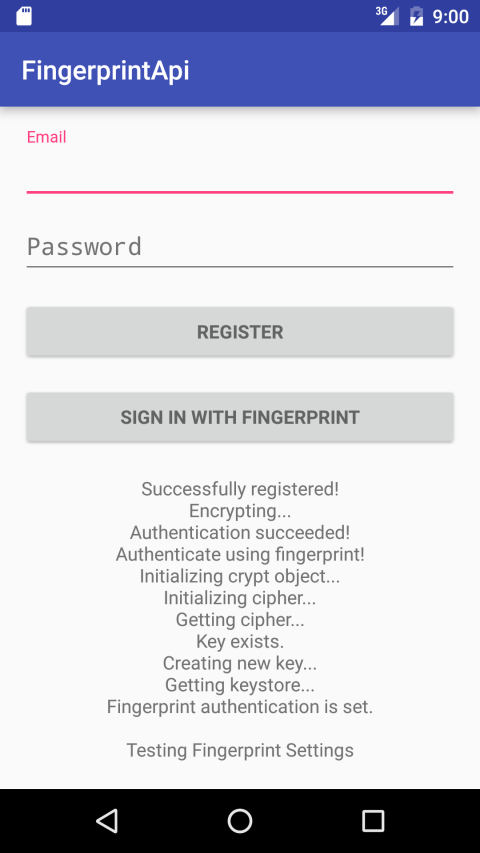
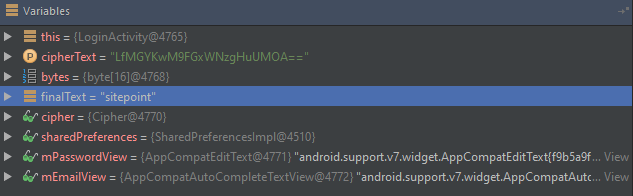
Going backwards, the cipher is now taken from the CryptObject. Inside encryptString, the doFinal method encrypts the password using the SecureKey cipher, then saves the password. The messages will display in the following order.
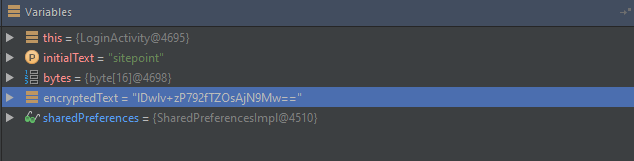
Using a breakpoint, you can see what encryptedText looks like.
First Authentication
Next time you run the application, the user must be able to login using their fingerprint (because there is no other option to login). The process of authenticating user credentials is decrypting the password. I have walked through most of the methods, but there are small changes that make the difference between encryption and decryption using Fingerprint API.
Inside the onCreate method uncomment the call to attemptFingerprintLogin and add the implementation.
private void attemptFingerprintLogin() {
    if (!testFingerPrintSettings())
        return;

    if (!usersRegistered())
        return;

    showProgress(true);
    mAuthTask = new UserLoginTask();
    mAuthTask.execute((Void) null);
}
Here I make use of the methods I mentioned to check fingerprint settings, and whether there is a user to login. Another thing to mention is that the constructor of UserLoginTask is different from the one used for the registration.
UserLoginTask() {
    mRegister = false;
    mEmail = null;
    mPassword = null;
    fingerprintHelper = new FingerprintHelper(LoginActivity.this);
}
Inside initCipher method, add a case for when the mode is equal to Cipher.DECRYPT_MODE. After the if statement write the following.
else {
    byte[] iv = Base64.decode(sharedPreferences.getString(PREFERENCES_KEY_IV, ""), Base64.NO_WRAP);
    IvParameterSpec ivspec = new IvParameterSpec(iv);
    cipher.init(mode, keyspec, ivspec);
}
Do the same for the doInBackground method of the UserLoginTask class after the closing bracket for the if(mRegister).
else {
    encrypting = false;
    if (!initCipher(Cipher.DECRYPT_MODE))
        return false;
}
Now decrypt the password if the authentication is successful. After the if statement in the authenticationSucceeded method, insert the following.
else {
    String encryptedText = sharedPreferences.getString(PREFERENCES_KEY_PASS, "");
    decryptString(encryptedText);
    print(R.string.fingerprint_authenticate_success);
}
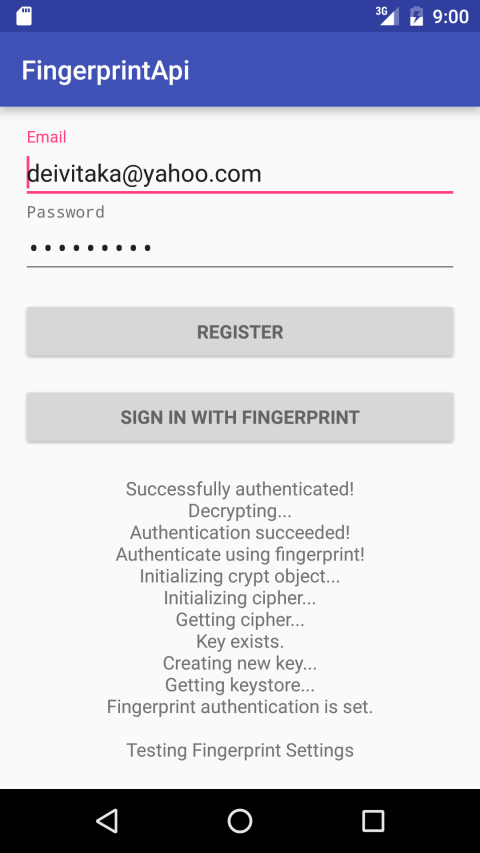
The decryptString method uses the cipher from the CryptObject returned to decrypt the password and then updates the fields with the user data to represent a successful login.
public void decryptString(String cipherText) {
    print("Decrypting...");
    try {
        byte[] bytes = Base64.decode(cipherText, Base64.NO_WRAP);
        String finalText = new String(cipher.doFinal(bytes));
        mPasswordView.setText(finalText);
        mEmailView.setText(sharedPreferences.getString(PREFERENCES_KEY_EMAIL, ""));
    } catch (Exception e) {
        print(e.getMessage());
    }
}
The result will look like the following.
Using a breakpoint you can see the decrypted password.
Test Cases
When using the Fingerprint API there’s a lot that can go wrong. I have tried to make a list of different test cases to take in consideration.
- No user is registered, and a user tries to log in.
- A user tries to register and their email or password are not valid.
- Screen Lock is not setup.
- Screen Lock is set to Swipe.
- Screen Lock is set to PIN/Password/Pattern, with no fingerprint set up.
- User adds a fingerprint after the registration.
- User deletes all fingerprints.
- User deletes all fingerprints, then adds a new one (Throwing a
KeyPermanentlyInvalidatedException). - Device reboots (I noticed that in the emulator the key is invalidated on reboot, as if fingerprints were all deleted).
- User tries to authenticate with unregistered fingerprint (Calling
onAuthenticationFailedin this case). - User tries to authenticate multiple times with an unregistered fingerprint (Calling
onAuthenticationErrorin this case).
Secure Your Apps
Whilst implementing the Fingerprint API can take effort, for users with a compatible device it will provide a much improved user experience.
What are your thoughts on Fingerprint readers? Do they improve an app?